Why Your Embroidery Design Looks Different on Fabric
You create a design. It looks clean on your screen. Lines are sharp. Text is clear. Colors look bright. But when you stitch it on fabric, it looks different. Lines shift. Shapes change. The design may look thick or loose.
This happens to many people. It is not always a machine problem. It is often about how stitches behave on real fabric. That is why learning about understanding push and pull compensation is so important. It helps you see why designs change and how to fix them before stitching.
What Does “Different on Fabric” Mean?
When we say a design looks different, we mean it does not match the screen version.
Common Changes:
-
Lines look wider or thinner
-
Circles turn into ovals
-
Text becomes hard to read
-
Edges look rough
-
Gaps appear in fills
These changes happen because fabric moves and stitches pull.
Why This Happens in Embroidery
Embroidery is not like printing. Ink sits on top. Thread goes inside the fabric.
Thread Action:
-
Pulls fabric in
-
Pushes stitches out
-
Changes shape slightly
Fabric Action:
-
Stretches
-
Moves under needle
-
Reacts to tension
Both work together. That is why the final look can change.
Real Experience: First-Time Stitch Surprise
Many beginners face this. A logo looks perfect on the computer. But on a shirt, the circle looks off. The text feels tight.
This is very common. Even small designs can change. Experts at Absolute Digitizing often fix these issues by adjusting stitch settings so designs stay true on fabric.
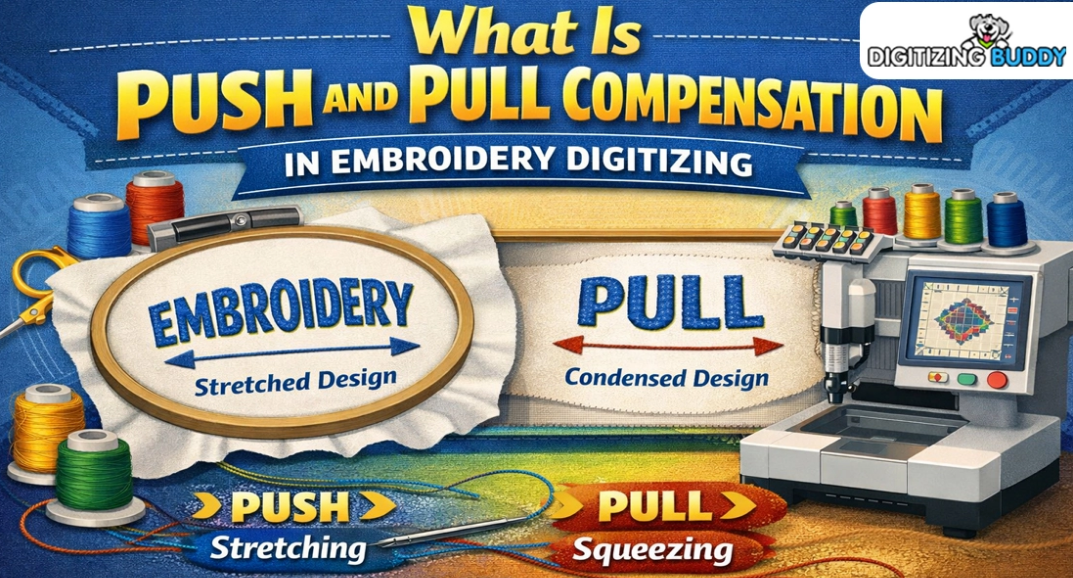
Understanding Push and Pull in Simple Words
When stitches go into fabric, they move it.
Pull:
Stitches pull inward. This makes shapes smaller.
Push:
Stitches push outward at the ends. This makes edges wider.
These two actions happen in every design.
How Fabric Type Changes Results
Not all fabrics act the same.
Soft Fabric:
-
Moves more
-
Needs light stitching
Thick Fabric:
-
Holds shape better
-
Can take more stitches
Stretch Fabric:
-
Moves a lot
-
Needs special care
If you use one design on all fabrics, results will change.
Why Small Designs Change More
Small designs are more sensitive.
Problems:
-
Letters close up
-
Details vanish
-
Lines merge
Even a tiny shift can ruin small text.
Why Large Designs Also Shift
Big designs cover more area.
Problems:
-
Uneven stitching
-
Fabric pulling in sections
-
Long stitch paths
Large designs need strong planning.
Stitch Density and Its Effect
Density means how tight stitches are.
High Density:
-
Pulls fabric hard
-
Makes design thick
Low Density:
-
Leaves gaps
-
Makes design weak
Balanced density keeps shapes stable.
Stitch Direction Matters
Stitches can go in many directions.
Good Direction:
-
Keeps fabric balanced
-
Gives smooth look
Bad Direction:
-
Pulls design unevenly
-
Causes distortion
Direction is a key design choice.
Underlay: The Hidden Support
Underlay is the base layer of stitches.
Why It Helps:
-
Holds fabric in place
-
Supports top stitches
-
Reduces movement
Without underlay, designs can shift more.
Thread Type Also Plays a Role
Not all threads act the same.
Thick Thread:
-
Covers more area
-
Adds weight
Thin Thread:
-
Shows more detail
-
Needs more stitches
Thread choice changes the final look.
Machine Settings Matter Too
Machines also affect results.
Important Settings:
-
Thread tension
-
Speed
-
Needle type
Wrong settings can increase design changes.
Common Problems and Fixes
Text Looks Too Thick
Cause:
Pull effect closes letters.
Fix:
Add space between letters.
Circles Look Like Ovals
Cause:
Uneven stitch direction.
Fix:
Adjust stitch angles.
Gaps in Fill Areas
Cause:
Low density or stretch fabric.
Fix:
Increase density slightly.
Edges Look Rough
Cause:
Poor path or no underlay.
Fix:
Add support stitches.
Why Testing Is Very Important
You cannot trust screen view only.
Always Test:
-
Use same fabric
-
Use same thread
-
Check real output
Testing shows real behavior.
Real Business Example
Embroidery shops face this daily. One design may look perfect on one fabric but not on another.
That is why many trust Absolute Digitizing. They adjust designs based on fabric type so the final result stays clean and consistent.
How Professionals Fix Design Changes
Experts follow a clear method.
Step 1: Study Fabric
Know how it behaves.
Step 2: Adjust Design
Change size, spacing, and flow.
Step 3: Add Compensation
Balance push and pull effects.
Step 4: Test Stitch
Check and refine.
Why Experience Matters
Push and pull are not exact numbers. They change with fabric and design.
Experts Know:
-
How much to adjust
-
Where to add space
-
When to reduce density
This skill comes from real practice.
EEAT in Embroidery Design
Good embroidery follows strong values.
Experience
Hands-on stitching knowledge.
Expertise
Deep understanding of fabric and thread.
Authority
Consistent clean results.
Trustworthiness
Reliable and tested designs.
These ensure better outcomes every time.
Tips to Keep Designs Looking the Same
Use Proper Digitizing
Good files reduce changes.
Match Fabric Type
Always plan before stitching.
Keep Text Clear
Avoid very small letters.
Use Underlay
It adds support.
Test Every Design
Never skip this step.
Why Screen and Fabric Will Never Match Fully
A screen is flat and perfect. Fabric is real and flexible.
Screen:
-
No movement
-
Perfect shape
Fabric:
-
Moves under needle
-
Reacts to stitches
So small changes will always happen. The goal is to control them.
Final Thoughts
Embroidery designs often look different on fabric because of how thread and fabric interact. Push and pull effects, fabric type, stitch density, and direction all play a role.
When you understand these factors, you can control them. Your designs will look cleaner and closer to your original idea.
With expert help from Absolute Digitizing, you can adjust your designs the right way and get smooth, accurate results on any fabric.